BTS9_PTWav_M

Contents
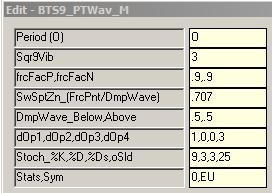
4 switches control actual output to the chart:
Parameter 6, Field 1 . . . Momentum Wave and Sacred Cut Level
Parameter 6, Field 2 . . . 180* .5 Trough (Pos) Friction Wave Level
Parameter 6, Field 3 . . . 270* Sacred Cut Level
Parameter 6, Field 4 . . . Friction Wave Crest and Trough (Sacred Cut Time)
These switches can be used individually and/or combined to make the chart suit your individual trade style.
If all 4 of the above are set to zero (0), there is no output to the chart.
All other switches set the math that is used internally in the dll to create the structure desired. Details of all options for all switches is found below.
Field 1: Fibonacci Trader's 'O'wn period
(Burton Cycle Tools use only the 'Own' period)
|
Options:
Field 1: Square of 9 Vibration
(Sqr9Vib is added to the root of the square of the range of the chart bar then re-squared)
Options: -6 to 6
Example: 9 tick range bar chart. [9^ = 81, 9 + 3 = 12, 12^ = 144] So on a 9 tick range bar chart a 3 yields a Sqr12 momentum wave on a Sqr9 chart. This happens to be one of my favorite charts.
Notes: This process yields the vibrational momentum wave of the chart as a function of incremental 180* units +/- the square of the range of the chart. [It should also be noted that consistent throughout Burton Cycle Tools the concept of 3 and 270* carry the same meaning. |
Options:
Field 1: Friction Factor Positive (Support)
(Qualifying friction level where momentum is slowing and can be displayed in the rising damping wave)
Field 2: Friction Factor Negative (Resistance)
(Qualifying friction level where momentum is slowing and can be displayed in the falling damping wave)
Options: Smaller fractions don't really work here because the point is to use this 1st occurrence of friction to notify the trader that 'Time' origin is imminent, ie NEXT BAR.
Notes: Friction begins 'or increases' when momentum has slowed less than 1. .9 is the default 1st display output where the upcoming price story begins to unfold. |
Options:
Field 1: Sweet Spot Zone (Time)
(One damping wave level below the .9 friction point embodies the Sacred Cut fractional point of .707, which in a vibrational context manifests as a significant 'Time Origin'. Zone here refers to this 2nd friction point on to the .5 point (Midpoint). These damping wave levels then embrace the friction range including .707, .666, .618, .583 and .5 . . . all referred to as the 'Sweet Spot Zone'.
Options: Suggest using the default .707.
Notes: Where 'Time' is known Phi abounds! Not only Phi, but all math finds meaning and therefore purpose in trading as the future unfolds from Origin. |
Options:
Field 1: Damping Wave Below (Rising)
(This setting controls the advance rate of the damping wave as well as the finished midpoint level at midpoint time (Wave Crest). Understand that a setting of .5 yields midpoint price at midpoint time.)
Field 2: Damping Wave Above (Falling)
(This setting controls the decline rate of the damping wave as well as the finished midpoint level at midpoint time (Wave Trough). Understand that a setting of .5 yields midpoint price at midpoint time.)
Options: The .5 damping wave is a powerful tool in defining COP$ (Condition Of Price) consistently. Almost all examples will use this setting exclusively. However, many significant structures can be tweaked by altering the damping wave, based on thorough understanding, personal preference and back-testing. Both .333 and .666 waves are very good for instance, but consistency is the key. Looking at one 'tweaked' structure while others are standard .5 can be quite difficult and may take extreme focus.
Notes: Many examples with complete explanations are shown under the 'Learning and Examples' section'.
|
Options:
Field 1: Display Option 1
(Wave and Sacred Cut Output)
Options: 0 = No output 1 = Show Wave (Line Style #2) 2 = Show Sacred Cut Level and Wave (Line Style #9) 3 = Show Sacred Cut Level only
Field 2: Display Option 2
(Positive Damping Wave Midpoint Level from Extension (next cycle, ie 180*) and origin.)
Options: 0 = No output 1 = Show prior cycle [+] Midpoint Level Extension (Line Style #5) 2 = Show current cycle [+] Midpoint Level and Extension (Line Style #1) 3 = Show current cycle [+] Midpoint Level only
Field 3: Display Option 3
( )
Field 4: Display Option 4
( )
|
Options:
Field 1: %K Stochastic's Parameter
Field 2: %D Stochastic's Parameter
Field 3: %Ds Stochastic's Parameter
Field 4: Stochastic's Oversold Level
|
Options:
Field 1:
Field 2:
|